Redstone scares most players away because the tutorials online start by showing you a 3D quasi-connectivity BUD switch on a cubic chunk boundary. Forget all that. The real fundamentals fit in five paragraphs, and once you understand them you can build automatic doors, mob farms, and item sorters without ever opening another wiki.
The One Rule You Need: Power
Everything in Redstone is one concept: some blocks emit power, some carry power, some receive power and do something. That’s it.
- Power emitters: Lever, button, pressure plate, redstone torch, daylight sensor, observer, redstone block.
- Power carriers: Redstone dust (the “wire”), repeaters, comparators.
- Power receivers: Door, piston, dispenser, dropper, lamp, hopper, note block, command block.
You connect an emitter to a receiver with carriers. When the emitter turns on, power travels along the carriers, the receiver activates, and the door opens / piston extends / dispenser fires.
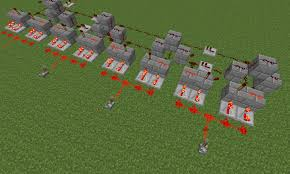
Redstone Dust: The Wire
Redstone Dust placed on a block becomes a flat “wire”. It carries power up to 15 blocks before fading to zero. Each block traveled reduces signal strength by 1. So a row of 16+ redstone dust blocks at full power on one end will be silent on the other.
To extend the signal beyond 15 blocks, you need a Repeater.
Repeaters: Refresh and Delay
A Redstone Repeater does two things at once:
- Resets signal strength back to 15
- Adds a tiny delay (1 to 4 ticks, adjustable with right-click)
If you want a wire to run 100 blocks across your base, drop a repeater every 14 blocks of dust and the signal will travel as far as you want without fading.
The delay function is also how you build pulses, timed circuits, and clocks. Two repeaters in a loop with a small redstone torch make a basic clock that ticks forever.
Redstone Torches: NOT Gates
A Redstone Torch placed on a block emits power constantly. Place one on the side of a block and it powers everything next to it. But here’s the trick: if you power the block the torch is attached to, the torch turns OFF.
This is the foundation of every logic gate. A torch inverts its input. Two inverters in series give you a buffer; an inverter on a wire gives you a NOT gate; combinations build AND, OR, XOR.
Observers: The Modern Power Tool
An Observer block emits a 1-tick redstone pulse every time the block in front of it changes state. Crop grows? Pulse. Furnace finishes smelting? Pulse. Door opens? Pulse. Sapling grows into a tree? Pulse.
Observers let you build “reactive” circuits without complex sensors. Almost every modern auto-farm uses observers to detect crop growth and trigger a piston harvest.
Build #1: An Auto Door
The simplest first project. Build a stone-brick wall with a 1x2 door-shaped hole. Place a sticky piston in front of the hole pushing a single block to seal it. Run redstone dust from a pressure plate two blocks away to the sticky piston.
Walk on the plate → piston pulls the block → doorway opens. Walk off → block snaps back into place. Five minutes, twelve blocks of materials, no zombies coming through your front door.
Build #2: Auto Smelter
Now we’re cooking. Stack three furnaces in a vertical column. Above each furnace, place a hopper feeding into it — this is your fuel input. From a chest on the side, run another hopper into the top of each furnace as the ore input. At the bottom of each furnace, another hopper feeding into a chest collects the smelted result.
Top view:
  [Fuel Chest] → Hopper → [Furnace]
  [Ore Chest]  → Hopper → [Furnace] ↓ Hopper → [Output Chest]
                            [Furnace]
No redstone required actually — hoppers move items automatically. Just dump 64 iron ore in the ore chest and 32 coal in the fuel chest, walk away, come back with iron ingots.
Build #3: Auto Crop Farm
Plant a 9-wide row of wheat with water at one end. Place an Observer pointing at the last wheat block. When the wheat grows to maturity, the Observer pulses. Wire the pulse to a Dispenser full of water at the far end. The water flush pushes all harvested wheat into a hopper, which feeds into a chest.
You’ve just built a one-button bread factory. Plant the seeds, walk away, come back to a chest full of wheat.
Common Beginner Mistakes
| Symptom | Cause | Fix |
|---|---|---|
| Wire doesn’t reach the end | 15-block decay | Add a Repeater mid-wire |
| Two wires interfere | Side-by-side dust connects | Stagger heights or use redstone bridges |
| Piston doesn’t retract | Used a normal piston instead of sticky | Add slimeball + piston = sticky |
| Door opens then closes instantly | Pressure plate too small/wood | Use a stone pressure plate; wood deactivates fast |
| Hopper doesn’t pull items | Hopper is powered (powered hoppers are disabled) | Move the redstone away from the hopper |
Next Steps
Once you understand the four pieces (dust, repeater, torch, observer), every advanced contraption is just bigger combinations. Recommended next builds:
- Item sorter: use hoppers + comparators to filter items into labeled chests.
- Mob farm: dark room + water push + drop chute + hopper output.
- Auto-tree farm: dispenser with bone meal + observer detecting sapling growth + sticky piston to break the trunk.
- Hidden door: sticky-piston wall that retracts when you flick a hidden lever behind a painting.
Redstone has the longest skill ceiling in Minecraft — you can spend hundreds of hours optimizing a 0-tick clock for a sugar cane farm if you want to. But everything starts with these basic pieces. Once dust, repeaters, torches, and observers feel obvious, the rest is just patience and YouTube tutorials for the contraption you want.